 798 535 535
 Sign in


Jak naciągnąć siatkę ogrodzeniową? Instrukcja szybkiego montażu
Posted by Natalia Szczepańska wrz 14, 2020 all , Installation of mesh fencing, panels
How to stretch the fence net? Quick assembly instructions
Galvanized fencing mesh is now a proven way to quickly separate from the neighborhood or a busy, dangerous street. It is also one of the cheapest, yet most durable, solutions available on the market, which are used by private and business investors. You can do the assembly on your own, and here we will tell you how to properly put on the fence net.
Choose the right material
Tensioning the fence net is crucial if you want to avoid faults and re-adjustment. Improperly made stretch of the mesh wire generates additional costs, the mesh deforms and sometimes needs to be replaced, because it does not perform its functions, and also looks unaesth aesthetically pleasing. So what is worth paying attention to at the various stages of installation and how to put a net on the fence? Among the products available on the market you can choose galvanized mesh and galvanized coated with an additional pvc layer.
Each of these solutions has its advantages and disadvantages, and the main difference here lies in the properties such as corrosion resistance or UV radiation. PVC mesh looks nice and is very tight and well stretched, can be used even more than 25 years! If you don't care about appearance, bet on galvanized mesh, which is also corrosion resistant like this PVC coated, but it doesn't have a coating in color and it's just grey/silver. Standard meshes have a mesh of 55 or 65 mm and a height of 1.5 meters, and the diameter of the wire varies between 2.5-3 and 4 mm, so you can make a fence as you need.
Setting up a fence net – where to start?
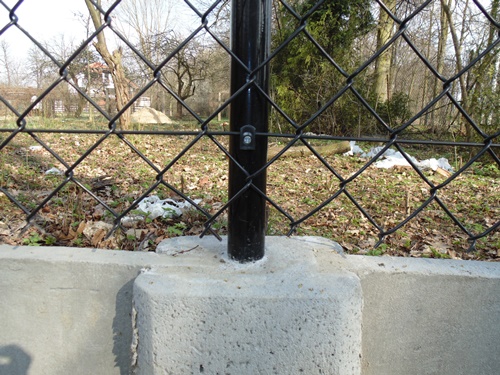
Before you focus on how to stretch a braided mesh, plan the location of each bar, including the initial, intermediate, and corner divisions. The installation of the fence net runs smoothly if the site has been properly cleaned of debris, stones or vegetation beforehand. Please note that the posts are usually 2.5 metres apart.
For corners you will need additional side supports, arranged at an angle of 45 degrees. They stabilize your structure and prevent the posts from moving at the spout stage. You can mount the posts on point or in the form of a wall and formwork system. A popular solution is also ready-made prefabricatedelements, thanks to which you save your time and do not have to spend an additional few days to dry individual layers of concrete.
How to attach a fence net to a post – a proven way
Once the posts are well positioned and leveled, you can stretch the fence net,starting from the startingposts. Remember that the tension wire should be located in 3 places: on top, in the center of each span and on the ground, that is, on average every half meter. To put on the garden mesh, clamps and eyed screws, tensionersand tension rods are also required.

Always start stretching the fence mesh by laying it flat so that the material can straighten itself. Here you will see a video on how to unfold, straighten the mesh roll and set the same height of each eyelet: https://www.youtube.com/watch?v=5fSh3F-V1Tw This is also the moment to check the arrangement of the individual meshes and their possible correction. Start with a post marked as initial or corner, making it easier for you to continue working. Make sure that tension rods are also mandatory at these posts!
Stretch the grid in minutes
Remember that there is no one-size-fits-all method of how to mount a fence net and how to connect it to the posts so that it can be used unchanged for as long as possible. Once the mesh is straightened, you move the tension rod between the outer eyelets and then attach it to the first post with the eyelet screws. When tensioning the wire of the fence mesh, it is good to take care of an additional person to help to achieve the best effect and optimal tension.
How do I put a net on the inside posts of your fence? Nothing easier! At this stage, you only need a standard bending wrench and a thin wire, which you can attach individual eyelets. If you want the mesh to be fixed on the intermediate posts in a more aesthetic way than with a tie wire, use small wire vias, which are mounted to the post with the included sheet metal screw. Fix the guide at 3 heights, just as a tension wire is run. Also, keep track of the grid voltage along its entire length. In the final phase, use a tensioner to give your fence the desired shape and remove any imperfections.

Online instruction on how to mount a fence net
Self-installation of the fence is a big saving, especially for people for whom every penny counts when building a house. Instructions for making a mesh fence are open to the public today not only on the websites of manufacturers, but also in the form of amateur video recordings. You can find an illustrative video of how to stretch the fence net online on your smartphone, no matter where you are.
See fencing mesh joining techniques on youtube or other popular video platforms. You can also find a lot of inspiration and advice from experienced fitters directly on the website of www.tanidrut.com – a proven mesh manufacturer and distributor of accessories for the installation of various types of fences. Every day, a new video appears on the web abouthow to mount a fence net, so you can easily see how others do it without the support of a teamof professionals.
